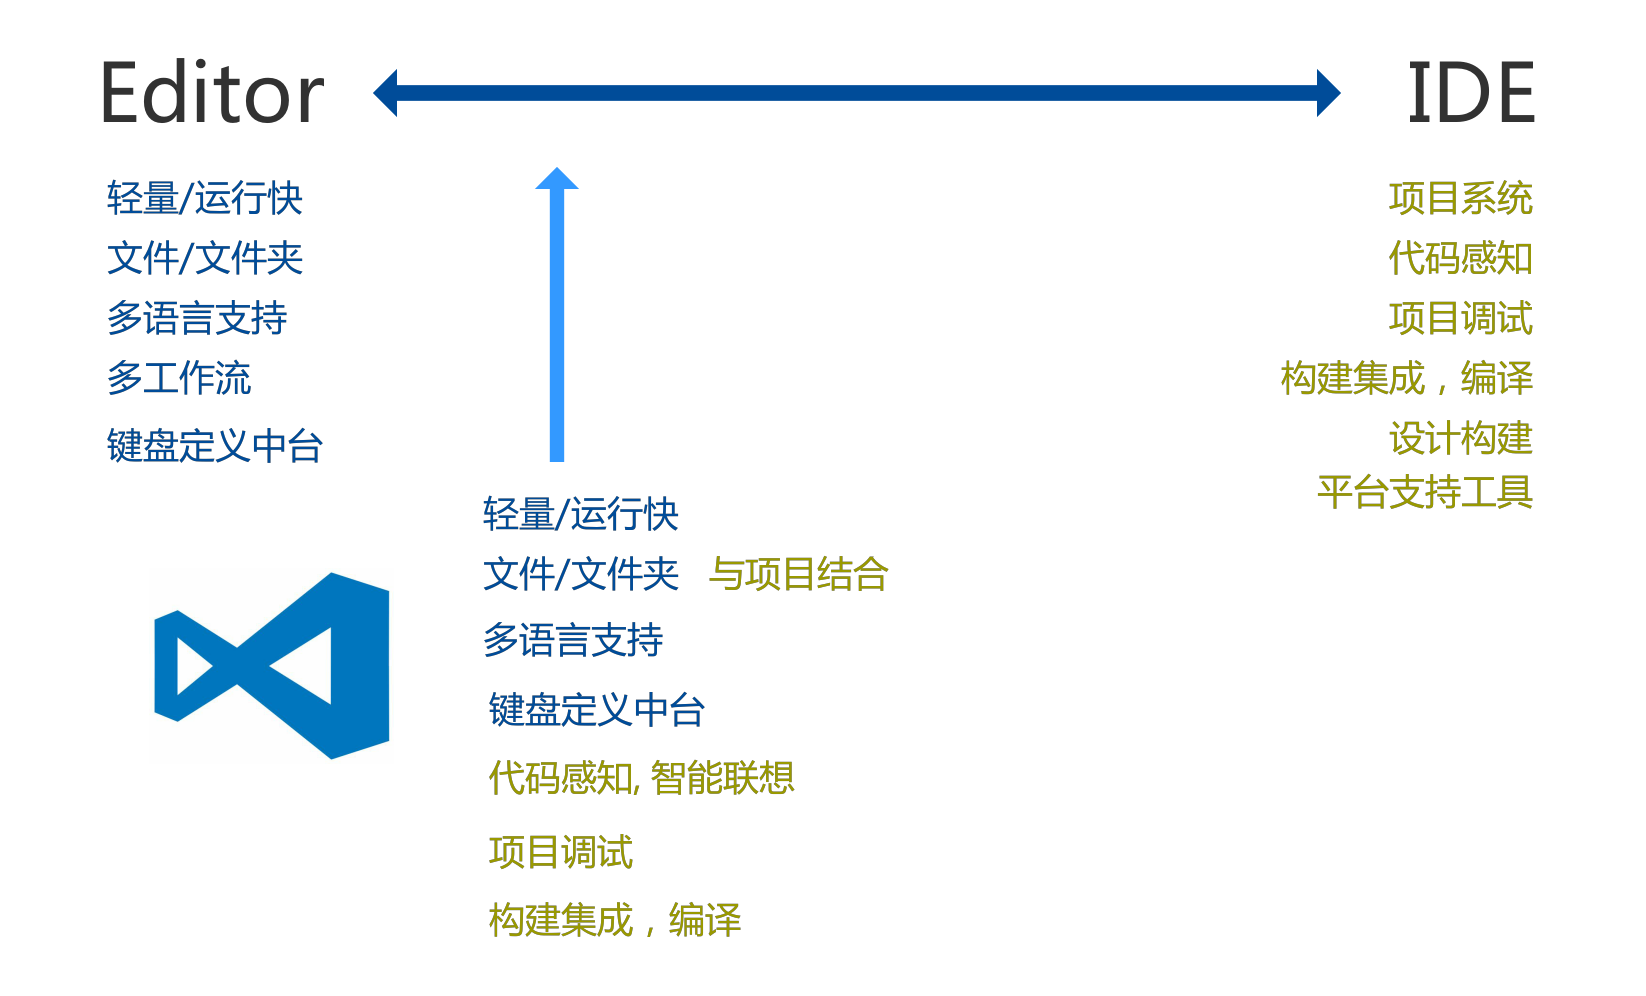
Visual Studio Code(简称VSCode) 是开源免费的IDE编辑器,原本是微软内部使用的云编辑器(Monaco)。
git仓库地址: https://github.com/microsoft/vscode
通过Eletron集成了桌面应用,可以跨平台使用,开发语言主要采用微软自家的TypeScript。 整个项目结构比较清晰,方便阅读代码理解。成为了最流行跨平台的桌面IDE应用
微软希望VSCode在保持核心轻量级的基础上,增加项目支持,智能感知,编译调试。
下载最新版本,目前我用的是1.37.1版本 官方的wiki中有编译安装的说明 How to Contribute
Linux, Window, MacOS三个系统编译时有些差别,参考官方文档, 在编译安装依赖时如果遇到connect timeout, 需要进行科学上网。
需要注意的一点 运行环境依赖版本 Nodejs x64 version >= 10.16.0, < 11.0.0, python 2.7(3.0不能正常执行)
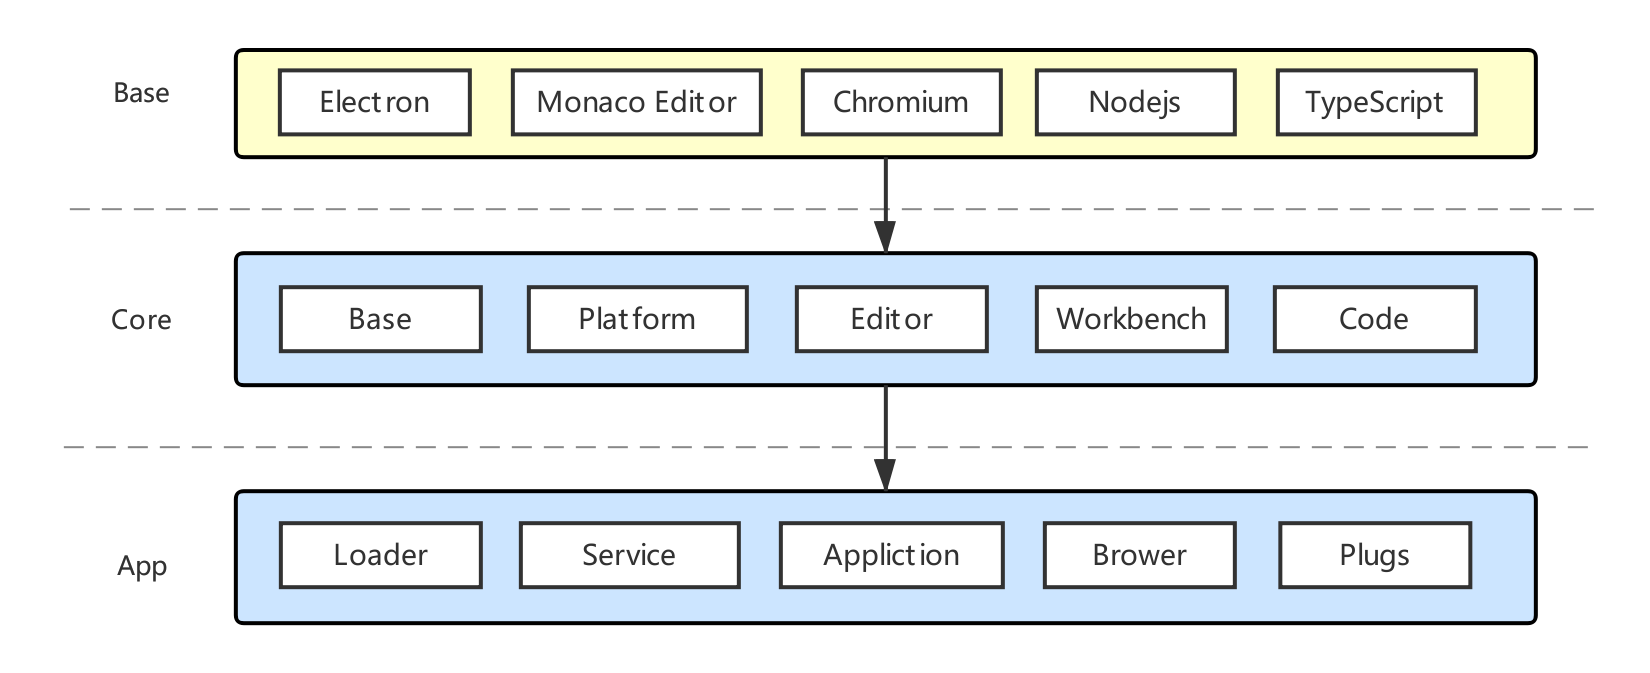
Electron 是一个使用 JavaScript, HTML 和 CSS 等 Web 技术创建原生程序的框架,它负责比较难搞的部分,你只需把精力放在你的应用的核心上即可 (Electron = Node.js + Chromium + Native API)
Monaco Editor是微软开源项目, 为VS Code提供支持的代码编辑器,运行在浏览器环境中。编辑器提供代码提示,智能建议等功能。供开发人员远程更方便的编写代码,可独立运行。
TypeScript是一种由微软开发的自由和开源的编程语言。它是JavaScript的一个超集,而且本质上向这个语言添加了可选的静态类型和基于类的面向对象编程
├── build         # gulp编译构建脚本
├── extensions    # 内置插件
├── product.json  # App meta信息
├── resources     # 平台相关静态资源
├── scripts       # 工具脚本,开发/测试
├── src           # 源码目录
└── typings       # 函数语法补全定义
└── vs
    ├── base        # 通用工具/协议和UI库
    │   ├── browser # 基础UI组件,DOM操作
    │   ├── common  # diff描述,markdown解析器,worker协议,各种工具函数
    │   ├── node    # Node工具函数
    │   ├── parts   # IPC协议(Electron、Node),quickopen、tree组件
    │   ├── test    # base单测用例
    │   └── worker  # Worker factory和main Worker(运行IDE Core:Monaco)
    ├── code        # VSCode主运行窗口
    ├── editor        # IDE代码编辑器
    |   ├── browser     # 代码编辑器核心
    |   ├── common      # 代码编辑器核心
    |   ├── contrib     # vscode 与独立 IDE共享的代码
    |   └── standalone  # 独立 IDE 独有的代码
    ├── platform      # 支持注入服务和平台相关基础服务(文件、剪切板、窗体、状态栏)
    ├── workbench     # 工作区UI布局,功能主界面
    │   ├── api              #
    │   ├── browser          #
    │   ├── common           #
    │   ├── contrib          #
    │   ├── electron-browser #
    │   ├── services         #
    │   └── test             #
    ├── css.build.js  # 用于插件构建的CSS loader
    ├── css.js        # CSS loader
    ├── editor        # 对接IDE Core(读取编辑/交互状态),提供命令、上下文菜单、hover、snippet等支持
    ├── loader.js     # AMD loader(用于异步加载AMD模块)
    ├── nls.build.js  # 用于插件构建的NLS loader
└── nls.js # NLS(National Language Support)多语言loader整个项目完全使用typescript实现,electron中运行主进程和渲染进程,使用的api有所不同,所以在core中每个目录组织也是按照使用的api来安排, 运行的环境分为几类:
main.js是vscode的入口。
app.once('ready', function () {
    //启动追踪,后面会讲到,跟性能检测优化相关。
    if (args['trace']) {
        // @ts-ignore
        const contentTracing = require('electron').contentTracing;

        const traceOptions = {
            categoryFilter: args['trace-category-filter'] || '*',
            traceOptions: args['trace-options'] || 'record-until-full,enable-sampling'
        };

        contentTracing.startRecording(traceOptions, () => onReady());
    } else {
        onReady();
    }
});
function onReady() {
    perf.mark('main:appReady');

    Promise.all([nodeCachedDataDir.ensureExists(), userDefinedLocale]).then(([cachedDataDir, locale]) => {
        //1. 这里尝试获取本地配置信息,如果有的话会传递到startup
        if (locale && !nlsConfiguration) {
            nlsConfiguration = lp.getNLSConfiguration(product.commit, userDataPath, metaDataFile, locale);
        }

        if (!nlsConfiguration) {
            nlsConfiguration = Promise.resolve(undefined);
        }


        nlsConfiguration.then(nlsConfig => {

            //4. 首先会检查用户语言环境配置,如果没有设置默认使用英语
            const startup = nlsConfig => {
                nlsConfig._languagePackSupport = true;
                process.env['VSCODE_NLS_CONFIG'] = JSON.stringify(nlsConfig);
                process.env['VSCODE_NODE_CACHED_DATA_DIR'] = cachedDataDir || '';

                perf.mark('willLoadMainBundle');
                //使用微软的loader组件加载electron-main/main文件
                require('./bootstrap-amd').load('vs/code/electron-main/main', () => {
                    perf.mark('didLoadMainBundle');
                });
            };

            // 2. 接收到有效的配置传入是其生效,调用startup
            if (nlsConfig) {
                startup(nlsConfig);
            }

            // 3. 这里尝试使用本地的应用程序
            // 应用程序设置区域在ready事件后才有效
            else {
                let appLocale = app.getLocale();
                if (!appLocale) {
                    startup({ locale: 'en', availableLanguages: {} });
                } else {

                    // 配置兼容大小写敏感,所以统一转换成小写
                    appLocale = appLocale.toLowerCase();
                    // 这里就会调用config服务,把本地配置加载进来再调用startup
                    lp.getNLSConfiguration(product.commit, userDataPath, metaDataFile, appLocale).then(nlsConfig => {
                        if (!nlsConfig) {
                            nlsConfig = { locale: appLocale, availableLanguages: {} };
                        }

                        startup(nlsConfig);
                    });
                }
            }
        });
    }, console.error);
}electron-main/main 是程序真正启动的入口,进入main process初始化流程.
直接看startup方法的实现,基础服务初始化完成后会加载 CodeApplication, mainIpcServer, instanceEnvironment,调用 startup 方法启动APP
private async startup(args: ParsedArgs): Promise<void> {

        //spdlog 日志服务
        const bufferLogService = new BufferLogService();

        // 1. 调用 createServices
        const [instantiationService, instanceEnvironment] = this.createServices(args, bufferLogService);
        try {

            // 1.1 初始化Service服务
            await instantiationService.invokeFunction(async accessor => {
                // 基础服务,包括一些用户数据,缓存目录
                const environmentService = accessor.get(IEnvironmentService);
                // 配置服务
                const configurationService = accessor.get(IConfigurationService);
                // 持久化数据
                const stateService = accessor.get(IStateService);

                try {
                    await this.initServices(environmentService, configurationService as ConfigurationService, stateService as StateService);
                } catch (error) {

                    // 抛出错误对话框
                    this.handleStartupDataDirError(environmentService, error);

                    throw error;
                }
            });

            // 1.2 启动实例
            await instantiationService.invokeFunction(async accessor => {
                const environmentService = accessor.get(IEnvironmentService);
                const logService = accessor.get(ILogService);
                const lifecycleService = accessor.get(ILifecycleService);
                const configurationService = accessor.get(IConfigurationService);

                const mainIpcServer = await this.doStartup(logService, environmentService, lifecycleService, instantiationService, true);

                bufferLogService.logger = new SpdLogService('main', environmentService.logsPath, bufferLogService.getLevel());
                once(lifecycleService.onWillShutdown)(() => (configurationService as ConfigurationService).dispose());

                return instantiationService.createInstance(CodeApplication, mainIpcServer, instanceEnvironment).startup();
            });
        } catch (error) {
            instantiationService.invokeFunction(this.quit, error);
        }
}这里通过createService创建一些基础的Service
src/vs/platform/environment/node/environmentService.ts
通过这个服务获取当前启动目录,日志目录,操作系统信息,配置文件目录,用户目录等。
src/vs/platform/log/common/log.ts
默认使用控制台日志ConsoleLogMainService 其中包含性能追踪和释放信息,日志输出级别
src/vs/platform/configuration/node/configurationService.ts
从运行环境服务获取内容
src/vs/platform/lifecycle/common/lifecycleService.ts
监听事件,electron app模块 比如:ready, window-all-closed,before-quit
可以参考官方electron app文档
src/vs/platform/state/node/stateService.ts
通过FileStorage读写storage.json存储,里记录一些与程序运行状态有关的键值对
src/vs/platform/request/browser/requestService.ts
这里使用的是原生ajax请求,实现了request方法
src/vs/platform/theme/electron-main/themeMainService.ts
这里只设置背景颜色,通过getBackgroundColor方法 IStateService存储
src/vs/platform/sign/node/signService.ts
private createServices(args: ParsedArgs, bufferLogService: BufferLogService): [IInstantiationService, typeof process.env] {

    //服务注册容器
    const services = new ServiceCollection();

    const environmentService = new EnvironmentService(args, process.execPath);
    const instanceEnvironment = this.patchEnvironment(environmentService); // Patch `process.env` with the instance's environment
    services.set(IEnvironmentService, environmentService);

    const logService = new MultiplexLogService([new ConsoleLogMainService(getLogLevel(environmentService)), bufferLogService]);
    process.once('exit', () => logService.dispose());
    //日志服务
    services.set(ILogService, logService);
    //配置服务
    services.set(IConfigurationService, new ConfigurationService(environmentService.settingsResource));
    //生命周期
    services.set(ILifecycleService, new SyncDescriptor(LifecycleService));
    //状态存储
    services.set(IStateService, new SyncDescriptor(StateService));
    //网络请求
    services.set(IRequestService, new SyncDescriptor(RequestService));
    //主题设定
    services.set(IThemeMainService, new SyncDescriptor(ThemeMainService));
    //签名服务
    services.set(ISignService, new SyncDescriptor(SignService));

    return [new InstantiationService(services, true), instanceEnvironment];
}SyncDescriptor负责注册这些服务,当用到该服务时进程实例化使用
src/vs/platform/instantiation/common/descriptors.ts
export class SyncDescriptor<T> {
    readonly ctor: any;
    readonly staticArguments: any[];
    readonly supportsDelayedInstantiation: boolean;
    constructor(ctor: new (...args: any[]) => T, staticArguments: any[] = [], supportsDelayedInstantiation: boolean = false) {
        this.ctor = ctor;
        this.staticArguments = staticArguments;
        this.supportsDelayedInstantiation = supportsDelayedInstantiation;
    }
}
main.ts中startup方法调用invokeFunction.get实例化服务
await instantiationService.invokeFunction(async accessor => {
    const environmentService = accessor.get(IEnvironmentService);
    const configurationService = accessor.get(IConfigurationService);
    const stateService = accessor.get(IStateService);
    try {
        await this.initServices(environmentService, configurationService as ConfigurationService, stateService as StateService);
    } catch (error) {

        // Show a dialog for errors that can be resolved by the user
        this.handleStartupDataDirError(environmentService, error);

        throw error;
    }
});
get方法调用_getOrCreateServiceInstance,这里第一次创建会存入缓存中 下次实例化对象时会优先从缓存中获取对象。
src/vs/platform/instantiation/common/instantiationService.ts
invokeFunction<R, TS extends any[] = []>(fn: (accessor: ServicesAccessor, ...args: TS) => R, ...args: TS): R {
    let _trace = Trace.traceInvocation(fn);
    let _done = false;
    try {
        const accessor: ServicesAccessor = {
            get: <T>(id: ServiceIdentifier<T>, isOptional?: typeof optional) => {

                if (_done) {
                    throw illegalState('service accessor is only valid during the invocation of its target method');
                }

                const result = this._getOrCreateServiceInstance(id, _trace);
                if (!result && isOptional !== optional) {
                    throw new Error(`[invokeFunction] unknown service '${id}'`);
                }
                return result;
            }
        };
        return fn.apply(undefined, [accessor, ...args]);
    } finally {
        _done = true;
        _trace.stop();
    }
}
private _getOrCreateServiceInstance<T>(id: ServiceIdentifier<T>, _trace: Trace): T {
    let thing = this._getServiceInstanceOrDescriptor(id);
    if (thing instanceof SyncDescriptor) {
        return this._createAndCacheServiceInstance(id, thing, _trace.branch(id, true));
    } else {
        _trace.branch(id, false);
        return thing;
    }
}这里首先触发CodeApplication.startup()方法, 在第一个窗口打开3秒后成为共享进程,
async startup(): Promise<void> {
    ...

    // 1. 第一个窗口创建共享进程
    const sharedProcess = this.instantiationService.createInstance(SharedProcess, machineId, this.userEnv);
    const sharedProcessClient = sharedProcess.whenReady().then(() => connect(this.environmentService.sharedIPCHandle, 'main'));
    this.lifecycleService.when(LifecycleMainPhase.AfterWindowOpen).then(() => {
        this._register(new RunOnceScheduler(async () => {
            const userEnv = await getShellEnvironment(this.logService, this.environmentService);

            sharedProcess.spawn(userEnv);
        }, 3000)).schedule();
    });
    // 2. 创建app实例
    const appInstantiationService = await this.createServices(machineId, trueMachineId, sharedProcess, sharedProcessClient);


    // 3. 打开一个窗口 调用

    const windows = appInstantiationService.invokeFunction(accessor => this.openFirstWindow(accessor, electronIpcServer, sharedProcessClient));

    // 4. 窗口打开后执行生命周期和授权操作
    this.afterWindowOpen();
    ...

    //vscode结束了性能问题的追踪
    if (this.environmentService.args.trace) {
        this.stopTracingEventually(windows);
    }
}
openFirstWindow 主要实现 CodeApplication.openFirstWindow 首次开启窗口时,创建 Electron 的 IPC,使主进程和渲染进程间通信。 window会被注册到sharedProcessClient,主进程和共享进程通信 根据 environmentService 提供的参数(path,uri)调用windowsMainService.open 方法打开窗口
private openFirstWindow(accessor: ServicesAccessor, electronIpcServer: ElectronIPCServer, sharedProcessClient: Promise<Client<string>>): ICodeWindow[] {

        ...
        // 1. 注入Electron IPC Service, windows窗口管理,菜单栏等服务

        // 2. 根据environmentService进行参数配置
        const macOpenFiles: string[] = (<any>global).macOpenFiles;
        const context = !!process.env['VSCODE_CLI'] ? OpenContext.CLI : OpenContext.DESKTOP;
        const hasCliArgs = hasArgs(args._);
        const hasFolderURIs = hasArgs(args['folder-uri']);
        const hasFileURIs = hasArgs(args['file-uri']);
        const noRecentEntry = args['skip-add-to-recently-opened'] === true;
        const waitMarkerFileURI = args.wait && args.waitMarkerFilePath ? URI.file(args.waitMarkerFilePath) : undefined;

        ...

        // 打开主窗口,默认从执行命令行中读取参数
        return windowsMainService.open({
            context,
            cli: args,
            forceNewWindow: args['new-window'] || (!hasCliArgs && args['unity-launch']),
            diffMode: args.diff,
            noRecentEntry,
            waitMarkerFileURI,
            gotoLineMode: args.goto,
            initialStartup: true
        });
}接下来到了electron的windows窗口,open方法在doOpen中执行窗口配置初始化,最终调用openInBrowserWindow -> 执行doOpenInBrowserWindow是其打开window,主要步骤如下:
private openInBrowserWindow(options: IOpenBrowserWindowOptions): ICodeWindow {

    ...
    // New window
    if (!window) {
        //1.判断是否全屏创建窗口
         ...
        // 2. 创建实例窗口
        window = this.instantiationService.createInstance(CodeWindow, {
            state,
            extensionDevelopmentPath: configuration.extensionDevelopmentPath,
            isExtensionTestHost: !!configuration.extensionTestsPath
        });

        // 3.添加到当前窗口控制器
        WindowsManager.WINDOWS.push(window);

        // 4.窗口监听器
        window.win.webContents.removeAllListeners('devtools-reload-page'); // remove built in listener so we can handle this on our own
        window.win.webContents.on('devtools-reload-page', () => this.reload(window!));
        window.win.webContents.on('crashed', () => this.onWindowError(window!, WindowError.CRASHED));
        window.win.on('unresponsive', () => this.onWindowError(window!, WindowError.UNRESPONSIVE));
        window.win.on('closed', () => this.onWindowClosed(window!));

        // 5.注册窗口生命周期
        (this.lifecycleService as LifecycleService).registerWindow(window);
    }

    ...

    return window;
}
doOpenInBrowserWindow会调用window.load方法 在window.ts中实现
load(config: IWindowConfiguration, isReload?: boolean, disableExtensions?: boolean): void {

    ...

    // Load URL
    perf.mark('main:loadWindow');
    this._win.loadURL(this.getUrl(configuration));

    ...
}

private getUrl(windowConfiguration: IWindowConfiguration): string {

    ...
    //加载欢迎屏幕的html
    let configUrl = this.doGetUrl(config);
    ...
    return configUrl;
}

//默认加载 vs/code/electron-browser/workbench/workbench.html
private doGetUrl(config: object): string {
    return `${require.toUrl('vs/code/electron-browser/workbench/workbench.html')}?config=${encodeURIComponent(JSON.stringify(config))}`;
}
main process的使命完成, 主界面进行构建布局。
在workbench.html中加载了workbench.js, 这里调用return require('vs/workbench/electron-browser/desktop.main').main(configuration);实现对主界面的展示
创建工作区,调用workbench.startup()方法,构建主界面展示布局
...
async open(): Promise<void> {
    const services = await this.initServices();
    await domContentLoaded();
    mark('willStartWorkbench');

    // 1.创建工作区
    const workbench = new Workbench(document.body, services.serviceCollection, services.logService);

    // 2.监听窗口变化
    this._register(addDisposableListener(window, EventType.RESIZE, e => this.onWindowResize(e, true, workbench)));

    // 3.工作台生命周期
    this._register(workbench.onShutdown(() => this.dispose()));
    this._register(workbench.onWillShutdown(event => event.join(services.storageService.close())));

    // 3.启动工作区
    const instantiationService = workbench.startup();

    ...
}
...工作区继承自layout类,主要作用是构建工作区,创建界面布局。
export class Workbench extends Layout {
    ...
    startup(): IInstantiationService {
        try {
            ...

            // Services
            const instantiationService = this.initServices(this.serviceCollection);

            instantiationService.invokeFunction(async accessor => {
                const lifecycleService = accessor.get(ILifecycleService);
                const storageService = accessor.get(IStorageService);
                const configurationService = accessor.get(IConfigurationService);

                // Layout
                this.initLayout(accessor);

                // Registries
                this.startRegistries(accessor);

                // Context Keys
                this._register(instantiationService.createInstance(WorkbenchContextKeysHandler));

                // 注册监听事件
                this.registerListeners(lifecycleService, storageService, configurationService);

                // 渲染工作区
                this.renderWorkbench(instantiationService, accessor.get(INotificationService) as NotificationService, storageService, configurationService);

                // 创建工作区布局
                this.createWorkbenchLayout(instantiationService);

                // 布局构建
                this.layout();

                // Restore
                try {
                    await this.restoreWorkbench(accessor.get(IEditorService), accessor.get(IEditorGroupsService), accessor.get(IViewletService), accessor.get(IPanelService), accessor.get(ILogService), lifecycleService);
                } catch (error) {
                    onUnexpectedError(error);
                }
            });

            return instantiationService;
        } catch (error) {
            onUnexpectedError(error);

            throw error; // rethrow because this is a critical issue we cannot handle properly here
        }
    }
    ...
}src/vs/base/common/event.ts
程序中常见使用once方法进行事件绑定, 给定一个事件,返回一个只触发一次的事件,放在匿名函数返回
export function once<T>(event: Event<T>): Event<T> {
    return (listener, thisArgs = null, disposables?) => {
        // 设置次变量,防止事件重复触发造成事件污染
        let didFire = false;
        let result: IDisposable;
        result = event(e => {
            if (didFire) {
                return;
            } else if (result) {
                result.dispose();
            } else {
                didFire = true;
            }

            return listener.call(thisArgs, e);
        }, null, disposables);

        if (didFire) {
            result.dispose();
        }

        return result;
    };
}
循环派发了所有注册的事件, 事件会存储到一个事件队列,通过fire方法触发事件
private _deliveryQueue?: LinkedList<[Listener
fire(event: T): void {
    if (this._listeners) {
        // 将所有事件传入 delivery queue
        // 内部/嵌套方式通过emit发出.
        // this调用事件驱动

        if (!this._deliveryQueue) {
            this._deliveryQueue = new LinkedList();
        }

        for (let iter = this._listeners.iterator(), e = iter.next(); !e.done; e = iter.next()) {
            this._deliveryQueue.push([e.value, event]);
        }

        while (this._deliveryQueue.size > 0) {
            const [listener, event] = this._deliveryQueue.shift()!;
            try {
                if (typeof listener === 'function') {
                    listener.call(undefined, event);
                } else {
                    listener[0].call(listener[1], event);
                }
            } catch (e) {
                onUnexpectedError(e);
            }
        }
    }
}src/vs/code/electron-main/main.ts
main.ts在启动应用后就创建了一个主进程 main process,它可以通过electron中的一些模块直接与原生GUI交互。
server = await serve(environmentService.mainIPCHandle);
once(lifecycleService.onWillShutdown)(() => server.dispose());仅启动主进程并不能给你的应用创建应用窗口。窗口是通过main文件里的主进程调用叫BrowserWindow的模块创建的。
在electron中,主进程与渲染进程有很多通信的方法。比如ipcRenderer和ipcMain,还可以在渲染进程使用remote模块。
ipcMain模块和ipcRenderer是类EventEmitter的实例。
在主进程中使用ipcMain接收渲染线程发送过来的异步或同步消息,发送过来的消息将触发事件。
在渲染进程中使用ipcRenderer向主进程发送同步或异步消息,也可以接收到主进程的消息。
创建IPC服务 src/vs/base/parts/ipc/node/ipc.net.ts
这里返回一个promise对象,成功则createServer
export function serve(hook: any): Promise<Server> {
    return new Promise<Server>((c, e) => {
        const server = createServer();

        server.on('error', e);
        server.listen(hook, () => {
            server.removeListener('error', e);
            c(new Server(server));
        });
    });
}src/vs/code/electron-main/app.ts
mainIpcServer
electronIpcServer
private openFirstWindow(accessor: ServicesAccessor, electronIpcServer: ElectronIPCServer, sharedProcessClient: Promise<Client<string>>): ICodeWindow[] {

        // Register more Main IPC services
        const launchService = accessor.get(ILaunchService);
        const launchChannel = new LaunchChannel(launchService);
        this.mainIpcServer.registerChannel('launch', launchChannel);

        // Register more Electron IPC services
        const updateService = accessor.get(IUpdateService);
        const updateChannel = new UpdateChannel(updateService);
        electronIpcServer.registerChannel('update', updateChannel);

        const issueService = accessor.get(IIssueService);
        const issueChannel = new IssueChannel(issueService);
        electronIpcServer.registerChannel('issue', issueChannel);

        const workspacesService = accessor.get(IWorkspacesMainService);
        const workspacesChannel = new WorkspacesChannel(workspacesService);
        electronIpcServer.registerChannel('workspaces', workspacesChannel);

        const windowsService = accessor.get(IWindowsService);
        const windowsChannel = new WindowsChannel(windowsService);
        electronIpcServer.registerChannel('windows', windowsChannel);
        sharedProcessClient.then(client => client.registerChannel('windows', windowsChannel));

        const menubarService = accessor.get(IMenubarService);
        const menubarChannel = new MenubarChannel(menubarService);
        electronIpcServer.registerChannel('menubar', menubarChannel);

        const urlService = accessor.get(IURLService);
        const urlChannel = new URLServiceChannel(urlService);
        electronIpcServer.registerChannel('url', urlChannel);

        const storageMainService = accessor.get(IStorageMainService);
        const storageChannel = this._register(new GlobalStorageDatabaseChannel(this.logService, storageMainService));
        electronIpcServer.registerChannel('storage', storageChannel);

        // Log level management
        const logLevelChannel = new LogLevelSetterChannel(accessor.get(ILogService));
        electronIpcServer.registerChannel('loglevel', logLevelChannel);
        sharedProcessClient.then(client => client.registerChannel('loglevel', logLevelChannel));

        ...

        // default: read paths from cli
        return windowsMainService.open({
            context,
            cli: args,
            forceNewWindow: args['new-window'] || (!hasCliArgs && args['unity-launch']),
            diffMode: args.diff,
            noRecentEntry,
            waitMarkerFileURI,
            gotoLineMode: args.goto,
            initialStartup: true
        });
    }
每一个信道,内部实现两个方法 listen和call
例如:src/vs/platform/localizations/node/localizationsIpc.ts
构造函数绑定事件
export class LocalizationsChannel implements IServerChannel {

    onDidLanguagesChange: Event<void>;

    constructor(private service: ILocalizationsService) {
        this.onDidLanguagesChange = Event.buffer(service.onDidLanguagesChange, true);
    }

    listen(_: unknown, event: string): Event<any> {
        switch (event) {
            case 'onDidLanguagesChange': return this.onDidLanguagesChange;
        }

        throw new Error(`Event not found: ${event}`);
    }

    call(_: unknown, command: string, arg?: any): Promise<any> {
        switch (command) {
            case 'getLanguageIds': return this.service.getLanguageIds(arg);
        }

        throw new Error(`Call not found: ${command}`);
    }
}
workbench.ts中startup里面Workbench负责创建主界面 src/vs/workbench/browser/workbench.ts
startup(): IInstantiationService {
    try {

        ...

        instantiationService.invokeFunction(async accessor => {

            // 渲染主工作界面
            this.renderWorkbench(instantiationService, accessor.get(INotificationService) as NotificationService, storageService, configurationService);

            // 界面布局
            this.createWorkbenchLayout(instantiationService);

            // Layout
            this.layout();

            // Restore
            try {
                await this.restoreWorkbench(accessor.get(IEditorService), accessor.get(IEditorGroupsService), accessor.get(IViewletService), accessor.get(IPanelService), accessor.get(ILogService), lifecycleService);
            } catch (error) {
                onUnexpectedError(error);
            }
        });

        return instantiationService;
    } catch (error) {
        onUnexpectedError(error);

        throw error; // rethrow because this is a critical issue we cannot handle properly here
    }
}
渲染主工作台,渲染完之后加入到container中,container加入到parent, parent就是body了。
this.parent.appendChild(this.container);
private renderWorkbench(instantiationService: IInstantiationService, notificationService: NotificationService, storageService: IStorageService, configurationService: IConfigurationService): void {

        ...

        //TITLEBAR_PART 顶部操作栏
        //ACTIVITYBAR_PART 最左侧菜单选项卡
        //SIDEBAR_PART 左侧边栏,显示文件,结果展示等
        //EDITOR_PART 右侧窗口,代码编写,欢迎界面等
        //STATUSBAR_PART 底部状态栏
        [
            { id: Parts.TITLEBAR_PART, role: 'contentinfo', classes: ['titlebar'] },
            { id: Parts.ACTIVITYBAR_PART, role: 'navigation', classes: ['activitybar', this.state.sideBar.position === Position.LEFT ? 'left' : 'right'] },
            { id: Parts.SIDEBAR_PART, role: 'complementary', classes: ['sidebar', this.state.sideBar.position === Position.LEFT ? 'left' : 'right'] },
            { id: Parts.EDITOR_PART, role: 'main', classes: ['editor'], options: { restorePreviousState: this.state.editor.restoreEditors } },
            { id: Parts.PANEL_PART, role: 'complementary', classes: ['panel', this.state.panel.position === Position.BOTTOM ? 'bottom' : 'right'] },
            { id: Parts.STATUSBAR_PART, role: 'contentinfo', classes: ['statusbar'] }
        ].forEach(({ id, role, classes, options }) => {
            const partContainer = this.createPart(id, role, classes);

            if (!configurationService.getValue('workbench.useExperimentalGridLayout')) {
                // TODO@Ben cleanup once moved to grid
                // Insert all workbench parts at the beginning. Issue #52531
                // This is primarily for the title bar to allow overriding -webkit-app-region
                this.container.insertBefore(partContainer, this.container.lastChild);
            }

            this.getPart(id).create(partContainer, options);
        });

        // 将工作台添加至container dom渲染
        this.parent.appendChild(this.container);
    }
workbench最后调用this.layout()方法,将窗口占据整个界面,渲染完成
layout(options?: ILayoutOptions): void {
        if (!this.disposed) {
            this._dimension = getClientArea(this.parent);

            if (this.workbenchGrid instanceof Grid) {
                position(this.container, 0, 0, 0, 0, 'relative');
                size(this.container, this._dimension.width, this._dimension.height);

                // Layout the grid widget
                this.workbenchGrid.layout(this._dimension.width, this._dimension.height);
            } else {
                this.workbenchGrid.layout(options);
            }

            // Emit as event
            this._onLayout.fire(this._dimension);
        }
}app.once('ready', function () {
//启动追踪
if (args['trace']) {
// @ts-ignore
const contentTracing = require('electron').contentTracing;
const traceOptions = {
categoryFilter: args['trace-category-filter'] || '*',
traceOptions: args['trace-options'] || 'record-until-full,enable-sampling'
};
contentTracing.startRecording(traceOptions, () => onReady());
} else {
onReady();
}
});这里如果传入trace参数,在onReady启动之前会调用chromium的收集跟踪数据, 提供的底层的追踪工具允许我们深度了解 V8 的解析以及其他时间消耗情况,
一旦收到可以开始记录的请求,记录将会立马启动并且在子进程是异步记录听的. 当所有的子进程都收到 startRecording 请求的时候,callback 将会被调用.
categoryFilter是一个过滤器,它用来控制那些分类组应该被用来查找.过滤器应当有一个可选的 - 前缀来排除匹配的分类组.不允许同一个列表既是包含又是排斥.
[关于trace的详细介绍](https://www.w3cschool.cn/electronmanual/electronmanual-content-tracing.html)
子进程通常缓存查找数据,并且仅仅将数据截取和发送给主进程.这有利于在通过 IPC 发送查找数据之前减小查找时的运行开销,这样做很有价值.因此,发送查找数据,我们应当异步通知所有子进程来截取任何待查找的数据.
一旦所有子进程接收到了 stopRecording 请求,将调用 callback ,并且返回一个包含查找数据的文件.
如果 resultFilePath 不为空,那么将把查找数据写入其中,否则写入一个临时文件.实际文件路径如果不为空,则将调用 callback .
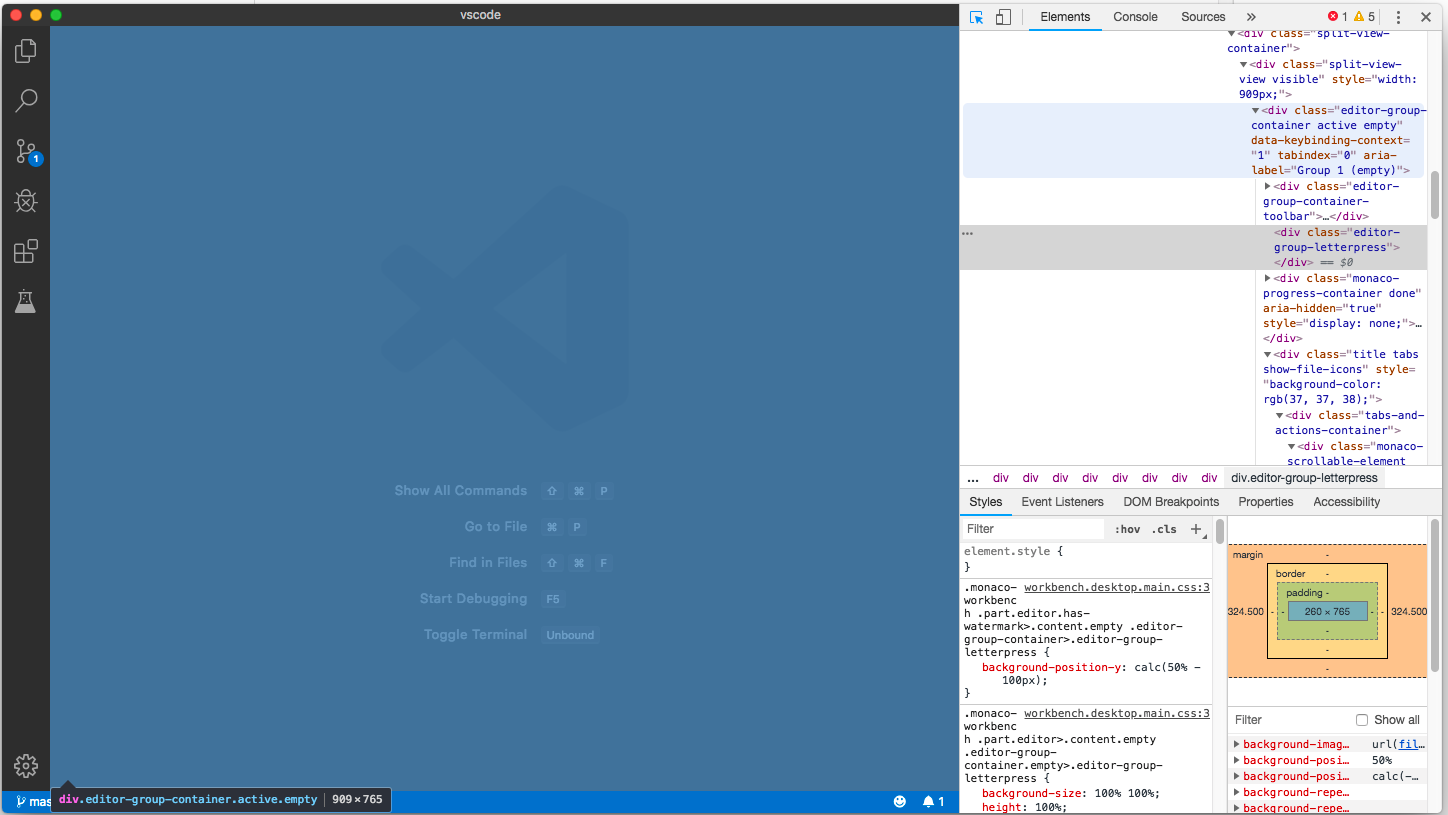
调试界面在菜单栏找到 Help->Toggle Developers Tools
调出Chrome开发者调试工具进行调试
https://electronjs.org/docs
https://github.com/microsoft/vscode/wiki/How-to-Contribute
https://github.com/Microsoft/vscode/wiki/Code-Organization
http://xzper.com/2016/04/17/vscode%E6%BA%90%E7%A0%81%E5%89%96%E6%9E%90/
http://www.ayqy.net/blog/vs-code%E6%BA%90%E7%A0%81%E7%AE%80%E6%9E%90/
京东创始人刘强东和其妻子章泽天最近成为了互联网舆论关注的焦点。有关他们“移民美国”和在美国购买豪宅的传言在互联网上广泛传播。然而,京东官方通过微博发言人发布的消息澄清了这些传言,称这些言论纯属虚假信息和蓄意捏造。
日前,据博主“@超能数码君老周”爆料,国内三大运营商中国移动、中国电信和中国联通预计将集体采购百万台规模的华为Mate60系列手机。
据报道,荷兰半导体设备公司ASML正看到美国对华遏制政策的负面影响。阿斯麦(ASML)CEO彼得·温宁克在一档电视节目中分享了他对中国大陆问题以及该公司面临的出口管制和保护主义的看法。彼得曾在多个场合表达了他对出口管制以及中荷经济关系的担忧。
今年早些时候,抖音悄然上线了一款名为“青桃”的 App,Slogan 为“看见你的热爱”,根据应用介绍可知,“青桃”是一个属于年轻人的兴趣知识视频平台,由抖音官方出品的中长视频关联版本,整体风格有些类似B站。
日前,威马汽车首席数据官梅松林转发了一份“世界各国地区拥车率排行榜”,同时,他发文表示:中国汽车普及率低于非洲国家尼日利亚,每百户家庭仅17户有车。意大利世界排名第一,每十户中九户有车。
近日,一项新的研究发现,维生素 C 和 E 等抗氧化剂会激活一种机制,刺激癌症肿瘤中新血管的生长,帮助它们生长和扩散。
据媒体援引消息人士报道,苹果公司正在测试使用3D打印技术来生产其智能手表的钢质底盘。消息传出后,3D系统一度大涨超10%,不过截至周三收盘,该股涨幅回落至2%以内。
9月2日,坐拥千万粉丝的网红主播“秀才”账号被封禁,在社交媒体平台上引发热议。平台相关负责人表示,“秀才”账号违反平台相关规定,已封禁。据知情人士透露,秀才近期被举报存在违法行为,这可能是他被封禁的部分原因。据悉,“秀才”年龄39岁,是安徽省亳州市蒙城县人,抖音网红,粉丝数量超1200万。他曾被称为“中老年...
9月3日消息,亚马逊的一些股东,包括持有该公司股票的一家养老基金,日前对亚马逊、其创始人贝索斯和其董事会提起诉讼,指控他们在为 Project Kuiper 卫星星座项目购买发射服务时“违反了信义义务”。
据消息,为推广自家应用,苹果现推出了一个名为“Apps by Apple”的网站,展示了苹果为旗下产品(如 iPhone、iPad、Apple Watch、Mac 和 Apple TV)开发的各种应用程序。
特斯拉本周在美国大幅下调Model S和X售价,引发了该公司一些最坚定支持者的不满。知名特斯拉多头、未来基金(Future Fund)管理合伙人加里·布莱克发帖称,降价是一种“短期麻醉剂”,会让潜在客户等待进一步降价。
据外媒9月2日报道,荷兰半导体设备制造商阿斯麦称,尽管荷兰政府颁布的半导体设备出口管制新规9月正式生效,但该公司已获得在2023年底以前向中国运送受限制芯片制造机器的许可。
近日,根据美国证券交易委员会的文件显示,苹果卫星服务提供商 Globalstar 近期向马斯克旗下的 SpaceX 支付 6400 万美元(约 4.65 亿元人民币)。用于在 2023-2025 年期间,发射卫星,进一步扩展苹果 iPhone 系列的 SOS 卫星服务。
据报道,马斯克旗下社交平台𝕏(推特)日前调整了隐私政策,允许 𝕏 使用用户发布的信息来训练其人工智能(AI)模型。新的隐私政策将于 9 月 29 日生效。新政策规定,𝕏可能会使用所收集到的平台信息和公开可用的信息,来帮助训练 𝕏 的机器学习或人工智能模型。
9月2日,荣耀CEO赵明在采访中谈及华为手机回归时表示,替老同事们高兴,觉得手机行业,由于华为的回归,让竞争充满了更多的可能性和更多的魅力,对行业来说也是件好事。
《自然》30日发表的一篇论文报道了一个名为Swift的人工智能(AI)系统,该系统驾驶无人机的能力可在真实世界中一对一冠军赛里战胜人类对手。
近日,非营利组织纽约真菌学会(NYMS)发出警告,表示亚马逊为代表的电商平台上,充斥着各种AI生成的蘑菇觅食科普书籍,其中存在诸多错误。
社交媒体平台𝕏(原推特)新隐私政策提到:“在您同意的情况下,我们可能出于安全、安保和身份识别目的收集和使用您的生物识别信息。”
2023年德国柏林消费电子展上,各大企业都带来了最新的理念和产品,而高端化、本土化的中国产品正在不断吸引欧洲等国际市场的目光。
罗永浩日前在直播中吐槽苹果即将推出的 iPhone 新品,具体内容为:“以我对我‘子公司’的了解,我认为 iPhone 15 跟 iPhone 14 不会有什么区别的,除了序(列)号变了,这个‘不要脸’的东西,这个‘臭厨子’。